|
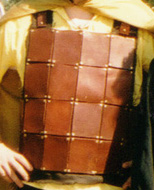
Leather Brigandine Armor
By: Staff Writer, Published: 2006-02-06, Parent Category: Leather
Materials:
- Approx 7 Sq feet of leather for plates.
- 200 Rivets and Rivet Setting Tool
- One large suede pigskin split (approx 8 sq feet)
- Leather Punch
- Ruler, Scissors
- Grommets, approx 20
- White Candle Wax (big chunk)
Introduction:
 This is very simple armor to make. It's called Brigandine armor, or open-faced Brigandine. Basically what it is is a shirt of small square plates. This armor got it's name because brigands would wear such plates between two layers of fabric so that you could not tell they were wearing armor until they got close. This armor will be open faced so you can see the plates. Oh, this armor will not fit a woman correctly. This is very simple armor to make. It's called Brigandine armor, or open-faced Brigandine. Basically what it is is a shirt of small square plates. This armor got it's name because brigands would wear such plates between two layers of fabric so that you could not tell they were wearing armor until they got close. This armor will be open faced so you can see the plates. Oh, this armor will not fit a woman correctly.
Leather Selection for Plates:
You can use any kind of leather for the plates, but to meet SCA armor guidelines you'll want to use veg tanned leather atleast 1/4th an inch thick, or wax hardened leather atleast 1/8th an inch thick. Or better yet 1/4th an inch thick that has been hardened in wax. If you just want this for costuming you can use any kind of leather you want, but the less thick and rigid it is the less it'll look like actual functional armor.
Leather Selection for Shirt:
I usually use suede to make the shirt (sleeveless) for this armor. You could use a thicker leather, or you could use canvas. It comes down to preference. In my opinion though some nice black suede will perform the best. A pigskin split like mentioned above will cost you around $18, though depending on your size you may need 2 of them (with about 80% of the second left over for other projects).
Measurements:
You will have 16 total plates making up the front and back of your armor (and 4 on each side). Measure the width of your chest (just the front armpit to armpit) and from the base of your neck (collar bone) to your waist. Divide each number by 4. The 2 numbers you end up with (mine are 4.5 long and 3.5 wide) are the dimensions of your plates. Cut 40 plates of those dimensions out of your thick leather. Then if you aren't waxing your plates punch one hole in each corner of each plate approx 1/4th an inch from the edge and skip the next section.
Hardening Leather
First of all you can only harden veg tan leather. That being said you need to first soak all your plates and then dry them. If you do not have a whitney punch then punch holes as described above in them while they are wet, it's easier. Once they are completely dry, and I mean completely (give it a day), you can wax them.
Waxing leather can be dangerous since wax can ignite into flame. What you can do is stick your candle wax in a disposable roasting pan in a double-boiler setup in your oven at 250 degrees or so until it melts. Then put it on the stove and stick a burner on low to keep it heater. Using tongs that you don't care if they get waxy dip each plate in the leather for a couple of minutes and let it absorb. Then simply pull it out, let the excess drip off, and wipe it with a paper towel. When it dries it'll be as hard as wood and as durable as leather. A great material. If you have a whitney punch you can now punch holes in it. I find its easier to use a whitney than a leather punch so thats why I recommend waiting and using a whitney if you have it.
Now some people will recommend parrafin wax instead of candle wax because it is cheaper. Well I've found that candle wax is easier to find, and was pretty cheap. You can get all the wax you need for a couple of bucks. Check at a local craft store like "Michaels."
Laying Things Out
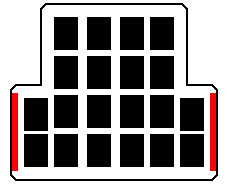 In the diagram to the left the black squares are your plates and the red bars are where you will be putting grommets, you will need two identical pieces that look like this. Layout your plates on the suede as shown to get a pattern and then cut out the suede. Once your suede is cut lay the plates out again to make sure everything looks okay. Then stick a pen or pencil down each hole in each plate to mark where holes need to be made in the suede. You can make such holes using a punch or an awl or other sharp sticking device. Note: the drawing leaves the shoulders out. You can make the shoulders in a variety of ways. If your suede is big enough you can simply make straps coming out of the shoulders that are about 3 inches wide and a foot long. If the suede is bigger still you can make your entire set of armor out of one piece of suede by laying everything out as if your armor were laying face up and unlaced. If not you can cut out the pieces as shown and later make 2 shoulder straps that you can either rivet or sew on. In the diagram to the left the black squares are your plates and the red bars are where you will be putting grommets, you will need two identical pieces that look like this. Layout your plates on the suede as shown to get a pattern and then cut out the suede. Once your suede is cut lay the plates out again to make sure everything looks okay. Then stick a pen or pencil down each hole in each plate to mark where holes need to be made in the suede. You can make such holes using a punch or an awl or other sharp sticking device. Note: the drawing leaves the shoulders out. You can make the shoulders in a variety of ways. If your suede is big enough you can simply make straps coming out of the shoulders that are about 3 inches wide and a foot long. If the suede is bigger still you can make your entire set of armor out of one piece of suede by laying everything out as if your armor were laying face up and unlaced. If not you can cut out the pieces as shown and later make 2 shoulder straps that you can either rivet or sew on.
Putting it all together:
Now its time to do rivets. Follow the instructions that can with your rivet setter and put in those nearly 200 rivets. You'll also now attach shoulder straps if you need to, and finally make holes and attach grommets on the sides so you can lace your armor up.
Variations and Accessories
You armor is now done, yay! You can add accessories to it in the form of any shiny piece of metal you can get your hands on. Additionally you can make the suede a little longer and include a spot to wear a belt and a built in armor skirt.
If you have a chain mail shirt this armor is the perfect accessory for it. It not only looks great over chain mail, but also it is added protection.
This article was written by Staff Writer.
|