
|
|
Leather BootsFor a great tutorial on making leather boots check out this site:http://design.seamlyne.com/footwear/footwear_index.aspThat tutorial is very extensive and useful (and hence, no reason to reinvent the wheel), however I'm going to include my own notes on it here. Lacing Blocks: If you don't even want to mess with lacing blocks on the front you could just cut holes and stick in grommets. You should still use the blocks on the back though. Other Notes: I did much less sewing than the tutorial asked for since I was doing it by hand (with a stitching awl). For most things I just went by with the awl once, instead of twice like a normal seam. I used deerskin for the welt, and I think it looks pretty good. I used a thick veg tan leather for the hard sole. This was a mistake IMO. vegtan is really stiff and I actually broke 2 needles trying to sew it (I ended up punching holes first). I trimmed the rubber vibram sole a little too close on the instep. Leave extra there at the top of the sole and the bottom. You'll thank me. This article was written by Staff Writer. |
|
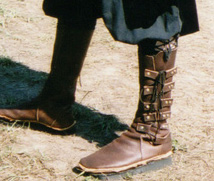 The major difference between the version of these boots I made and those described in the tutorial is that I riveted lacing blocks on both sides of the side slit. I did this for 2 reasons: 1, the rivets looked cool; and 2, it was easier to rivet them on than to sew each lacing block separatly. I also did not like how the tutorial boots laced, it just didn't look functional. I altered my design so that they lace up like a normal boot or shoe. I still included the heel block but I used it like the middle bottom lacing block that some shoes have. Your rear lacing blocks should be at most 2 inches long and should start at the exact middle of the back of your boot, otherwise they end up too close to the front lacing blocks.