|
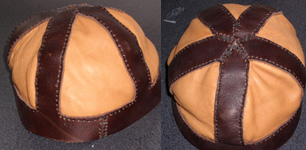
Quick Leather Hat/Helm
By: Staff Writer, Published: 2006-02-06, Parent Category: Leather
Materials:
 Introduction: Introduction:
Oftentimes its hard to find nice headwear at a decent price. This hat is fashioned after a design I saw at a Ren Fair (that cost $335). The materials for this hat should end up costing less than $10 and it'll take at most 4 hours of your time.
There are variations in the design for this hat. I used normal 7oz cowhide and deerskin because I wanted the hat to stretch to fit my head (my head is oval, the hat by default is circular). I also had it left over after another project. However you can substitute veg tan leather for either leather types. Its harder to work worth, more expensive, and stiffer. Or you could say it protects better. If you do decide to use veg tan you'll probably want to rivet everything together, instead of sewing it. If you want to wear this in combat you'll definitely want thick veg tan (and its about impossible to sew through - I broke a needle once trying).
Measurements:
The first thing you need to find is the circumference of your head. Personally I've got a big head with a circumference of roughly 2 feet. It is also better to cut too much rather than too little - so add an extra inch to whatever you come up with.
Once you know the circumference of your head (in inches with decimals) it's time to break out the calculater. First of all subtract 5 from your diameter and then divide that number by 5 and write the number down. We'll call that number "A." Now, divide A in half and we'll call that number "B."
 When you're done cutting out the leather you're going to get something that looks like this. The numbers represent the distance between each prong, or in the case of the B's, between the prong and the edge. When you actually get this altogether you will sew the two ends together and that will be the back of your hat.... but I get ahead myself. Also, even though my black lines are of varying thickness (yay art skills!), everything that is black in that diagram should be 1 inch thick - and the total length is the circumference of your head we found above. The idea of all this measuring is that we're trying to get a headband with 5 1-inch wide strips jutting out from it equidistant from each other. When you're done cutting out the leather you're going to get something that looks like this. The numbers represent the distance between each prong, or in the case of the B's, between the prong and the edge. When you actually get this altogether you will sew the two ends together and that will be the back of your hat.... but I get ahead myself. Also, even though my black lines are of varying thickness (yay art skills!), everything that is black in that diagram should be 1 inch thick - and the total length is the circumference of your head we found above. The idea of all this measuring is that we're trying to get a headband with 5 1-inch wide strips jutting out from it equidistant from each other.
Cutting the Cowhide:
Now we can start cutting out the leather... Its a funny shape to cut so be careful that you don't mess up. First measure a 1 inch wide strip using your head circumference for length. Then using a ruler measure from one end "B", mark the position and measure another inch, and mark it. Then measure "A", and do another 2 marks an inch apart, and so on until you get to the end. Double check your marks now, make sure they are all 1 inch apart, that there are 10 of them (2 for each prong) and that they are equidistant from each other. Then using a ruler extend the prongs out 8-10 inches (you want extra), and finish tracing out your pattern. Then cut it out.
Take your cutout pattern and wrap it around your head. While it is around your head (you're holding it tight in back) have someone lay the straps down on your head until they form a star right in the dead center of your dome. Using a pen have your friend mark the center of the star on each individual strap. That is going to be the center of your hat. Then trim the prongs so that their ends form triangles with the dot remaining as the very tip of the point. This leather piece is now finished being cut.
Preparing the Cowhide for Sewing:
You can sew the cowhide directly and skip this step, but its very very hard (especially if you're using thicker leather like I was (7 oz). Instead run your overstitch wheel about 1/8th an inch from the edge of the leather on all the inside edges (so all the edges of the prongs, and the edges of the leather between the prongs. Then using your hole punch on the smallest setting punch holes roughly where all the marks are made (it doesn't need to be THAT precise so don't sweat it). You can also punch holes in the two ends of the base strip where they will connect in back of your head. This hole punching is tough on the hands and annoying. Its also the last hard thing you have to do.
Sewing the Hat
First cut out triangles of deerskin that you think will roughly cover the triangle holes that are evident if you put the cowhide on your head. Always err on the side of too much. Now you can glue the deerhide down if you want, and it does help (because its so hard to sew inside a round object), but its not necessary. So basically just go around the triagle in the holes you punched using your leather awl. You don't need to punch holes in the deerskin since it is so easy to puncture with a needle. Do each triangle separately, and don't sew anywhere where you'd need to sew cowhide to cowhide. When you're done it'll look like a hat but the "Star" on top will not be sewn, and the cowhide will not be sewn together in back. Take your thin leather lace and sew the back and the star using a loop stich. Your hat is done.
Variations and Accessories
The hat is done, but the title of this page says "hat/helm." So how do you make it a helm? Well really right nows its just a "skullcap" You could add a "dress" to it. Basically thats a flap or flaps of leather that hang down the back and cover your shoulders and back of your neck. I'm sure you know what I'm talking about. That can be added by using another piece or pieces of cowhide. You could also put chain mail over it. Or use chain mail to accessorize. Finally you can use brass rivets and spikes to dress the helmet up. Add shiny things to make it look like a crown, add metal things to make it look like a helmet.
Another good use for this hat is as padding underneath your steel helmet. This will help absorb any blows to your head, and hopefully make it more form fitting.
This article was written by Staff Writer.
|